

What to Verify Before Your Mould Protector Vision Camera Goes Live
Key Takeaways
- Confirm the machine has a working robot interface (EUROMAP 12 or 67) before choosing how to connect your mould protector vision camera.
- Check that every signal the inspection needs reaches the vision controller.
- Match inspection zones to real mould conditions: parts, inserts, cores, slides, lifters and ejector return.
- Test the interlock so a failed inspection stops mould closing.
- Work through a written checklist before the first production cycle.
A mould protector vision camera is only as reliable as the setup behind it. Most go-live problems come from the machine connection or the inspection settings, not the camera itself. This guide covers what to verify so your vision mould protection system works from the first cycle. For a feature overview, read our guide to the features of mould protector vision camera systems.
1. Verify the Machine Interface
Start with the press. Many horizontal machines offer a robot interface (EUROMAP 12 or EUROMAP 67). A quick-connect unit fitted between the robot and press lets the mould protection vision camera system read machine signals while the robot keeps working normally.
Do not assume a connector means a complete interface. Some newer machines with integrated robot-press systems connect the robot through another system. Check the press documentation, or ask the manufacturer, to confirm the connector carries a full robot interface.
If the available robot interface does not provide the required signals, ask the press and vision-system suppliers to specify an approved connection method. Depending on the machine and system, this may involve a suitably configured I/O module and signal wiring. Settle this at the project-definition stage to cut installation time and downtime.
Before installing a quick-connect unit, stop the machine, home the robot and disconnect the robot from the interface.
2. Confirm Signals and Inspection Timing
The machine’s own data decides when each inspection happens. List the signals your application needs, confirm each one reaches the controller, and check that the inspection triggers after ejection and before the mould closes.
3. Check What the Camera Must Inspect
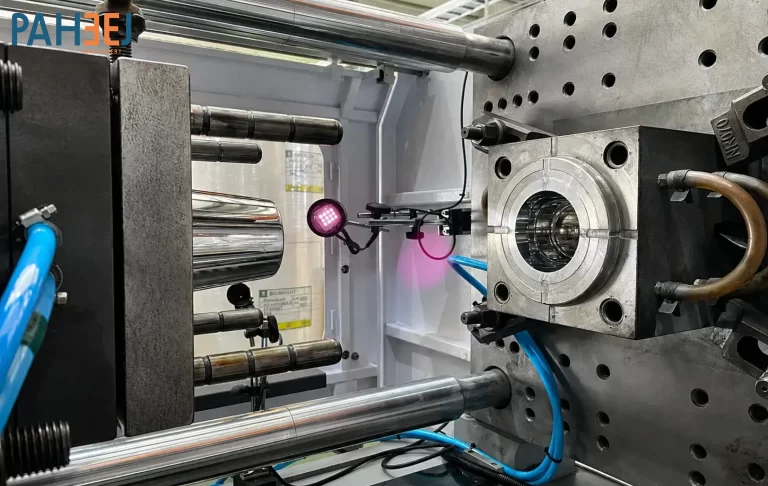
A mould inspection vision camera should reflect actual mould conditions. Before the next closing, verify:
- The moulded part has been removed.
- Moving cores are back in the home position.
- Slides and lifters have returned.
- The ejector plate has returned.
- The mould area is clean.
Unseated cores, unlatched slides or lifters, and parts left in the mould can interfere with closing. The result can be damaged shut-offs, broken parts, cracked inserts and downtime. Paheej systems can also check insert position, ejector pin retraction and foreign material. See how the mould protector vision camera system works.
4. Test the Interlock
When an inspection fails, the system can inhibit mould closing, ejector movement or both, depending on the application. During commissioning, trigger a controlled fault and confirm the machine stops. Also confirm that alarms and event logs record the stop.
. Review Zones, Lighting and Sensitivity
Check that detection zones cover every cavity and angle, lighting is consistent, and sensitivity balances protection against false stops. Follow your supplier’s commissioning procedure for calibration and acceptance testing.
Pre-Go-Live Checklist
- Press documentation confirms a full robot interface, or an I/O module is planned.
- Machine stopped, robot homed and interface connected correctly.
- All required machine signals confirmed
- Inspection point set between ejection and closing
- Zones cover parts, inserts, cores, slides, lifters and ejector return.
- Lighting and sensitivity reviewed.
- Interlock tested with a controlled fault.
- Alarms and logging working
- Operators briefed on alerts.
Conclusion
Verify the interface, signals, inspection conditions and interlock before production starts, and your mould protector vision camera can protect tooling from day one. To see the wider benefits, read how vision camera systems are transforming mould protection.
Frequently Asked Questions (FAQs)
What should I verify before installing a mould protector vision camera?
Confirm that the machine has a compatible robot interface, such as EUROMAP 12 or EUROMAP 67, and that all required machine signals can reach the vision controller.
Does a robot connector guarantee compatibility with a mould protector vision camera?
No. A robot connector does not always provide a complete robot interface. Check the machine documentation or consult the manufacturer to confirm that the required signals are available.
What if the machine does not have a suitable robot interface?
An appropriately configured I/O module with suitable signal wiring may be used to connect the machine signals to the vision controller. The connection method should be confirmed with the machine and vision-system suppliers.
What happens when a mould inspection fails?
Depending on the system configuration, the vision system can prevent mould closing, stop ejector movement, or both. This helps prevent mould damage and unnecessary production downtime.